How You Can Fix Holes in Drywall: Step-by-Step Instructions
There are several other ways in which dry wall can get damaged. It is prone to being broken by doorknobs, being dented by youngsters throwing their toys, or having its integrity compromised by poor workmanship.
Repairing damaged drywall is an important undertaking for owners who wish to keep the structural soundness of the inner partitions of their homes, whatever the origin of the injury. Acquire the abilities essential to make speedy repairs with a variety of instruments.
How to Patch a Damaged Area
A gap in your drywall is extra than just an eyesore; it might additionally function a passageway for pests that you don’t want in your own home, and it could injury the home’s structural integrity. Fixing the issue might also be difficult in some cases. However, in case you have sufficient data and the appropriate equipment, you probably can patch a hole in drywall such that it gives the looks that it was by no means there. The approach that you use will be determined by the dimensions of the outlet: smaller holes may be repaired with a simple patch, whereas bigger holes take more labor however are still throughout the capabilities of the overwhelming majority of owners.
The surrounding region should first be cleaned, and this have to be accomplished regardless of whether you wish to use a patch kit or a way that’s extra full. Remove any unfastened paint with a putty knife and sand the perimeters to produce a smooth surface that will allow the patch to stick properly.
After the hole has been cleaned and prepped, the mesh may be covered up by making use of a thick coat of spackle or joint compound over it. This will be positive that it isn’t seen. After the spackling has had a chance to cure, you must sand it flippantly. After that, you may prime the world and paint it.
When dealing with holes of a big measurement, you will want to bolster the outlet by inserting a piece of wood across the aperture and screwing it to the drywall on each side. This will assist in supporting the newly patched part of drywall and stopping it from drooping or warping. After that, you will need to prepare the drywall restore by first slicing it to the suitable dimension and then using drywall screws to secure it into place. After that, you will cover the seams with tape after which “mud” them (apply a coating of joint compound).
This step could be very essential because it’s going to make positive that your patching job seems as if it was carried out by an expert. If the compound isn’t applied uniformly and then smoothed down before it is allowed to treatment, the completed product of a do-it-yourself drywall repair job is going to look horrible. This is the primary cause for this.
If you might have a huge hole in the wall that needs to be patched, you will require a particular patch that is more manageable to cut than a typical piece of drywall. In order to cut the opening within the drywall, additionally, you will need a utility knife and an influence drill fitted with a drywall bit. The installation of this sort of patch will want extra time and work, however it will end result in the biggest possible outcome.
Utilizing a Repair Kit
Minor flaws similar to nail holes and dents could additionally be coated with a dab of touch-up paint, however in case you have lots of these spots to repair or the hole is critical, it may be time to invest in a patch kit. A good drywall patch equipment will include every little thing you want to do the job, from drywall restore material to a putty knife and joint compound, so remember to look for one which meets these standards. The best kits are those that may be utilized with minimal effort and include all the required components inside a single, well-organized container.
One of the best options is the DAP Wall repair Patch Kit, which includes every thing you want to rapidly and effectively repair a hole or crack in the wall. You can discover this kit on Amazon.com. This repair equipment comes with a patch that adheres to its personal surface in addition to a tube of joint compound, which is more convenient to work with than spackle and produces a superior finish.
To start, clear the realm surrounding the damaged region and remove any free residue that might be connected to the wall. If there may be any, move on to the subsequent step. After making use of a light coat of joint compound to the repair, easy the surface with a putty knife and feather the sides so that they fit in with the encompassing drywall. After the surface has had time to remedy, use a sanding sponge to lightly sand the area that was repaired so as to eliminate any ridges and convey the floor to a more even texture.
After the area has been sanded right down to a wonderfully easy end, prime it and paint it so that it is in maintaining with the rest of the wall. Because this can help guarantee that the surface is sealed and ready for colour, it’s best to choose a primer that is suggested by the maker of the paint you wish to use.
You can also elect to purchase a specialist patch for drywall that can be utilized by simply peeling it off and sticking it the place it must be. This is a fast and easy resolution that is useful for minor holes. There can additionally be a product called Duck Self-Adhesive Drywall Repair Fabric that is a wonderful choice. This product comes in a roll that is six inches wide and could be positioned whichever is critical with out the want to first apply spackle or tape.
Before you get started in your venture, you want to be positive that the realm where you’ll be working does not have any pipes or cables which may be flowing through it. When you are attempting to mend your hole, the last thing you want to happen is to accidently minimize a wire or bust a pipe in the course of. When you are certain that the situation doesn’t embody any possible hazards, rigorously position the drywall patch the place it must be and then use drywall screws to repair it to the furring strips.
Utilization of a Wire Mesh Patch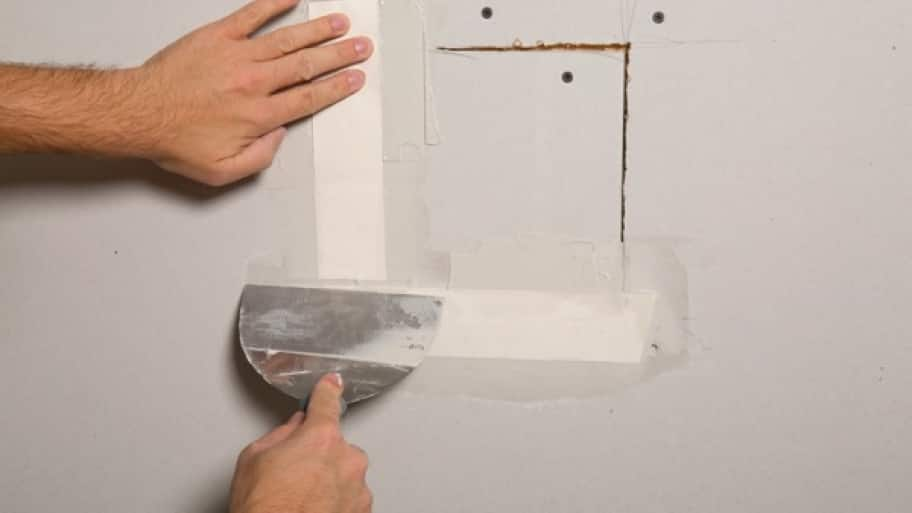
Walls could also be rapidly repaired from injury corresponding to holes and dents by using an aluminum mesh patch. You can find these patches at almost any hardware, house improvement, or paint store. They cannot rust since they are composed of aluminum and so they stick with themselves. After the damaged space has been sanded down and cleaned, apply a coat of joint compound to the again of the patch after which push it into place on the wall. After that, easy the surface with a putty knife after applying a second coat of drywall mud. Following these steps will make the restore seem extra seamless with the the rest of the wall.
Before making use of the patch, take away any mud from the affected space by wiping it down with a sponge that has been slightly dampened. Then, utilizing fiberglass mesh drywall tape, tape the sides of the restore where it was removed. The tape will help in the prevention of future cracks along with offering the patch with additional power. After the tape has been adhered to the floor, a thick coating of drywall mud should be applied over the restore and tape. Give the muck an opportunity to dry off fully over night.
Before making use of a drywall patch to fix an enormous hole, it’s possible that you’ll first must trim again the encircling wall until you attain strong drywall. This step is critical when mending a large gap. After you might have completed this step, you will be able to put up a brand new piece of drywall as an alternative. Furring strips may also be required to find a way to provide support for larger holes. These strips will be of help in holding the patch for the drywall and can forestall it from falling into the wall.
In order to get the outlet prepared for the repair, you will first need to make use of a utility knife to trim away any sections which may be loose or uneven. After that, sand the region until it’s stage with the wall that’s throughout it. After that, you could prime and paint the repaired section in order that it blends in with the relaxation of the wall.
The process of repairing a hole in drywall just isn’t very difficult, however it could be time-consuming and labor-intensive at occasions. Utilizing a patch package makes the task lots easier and extra manageable. It comes with everything you have to get the task carried out successfully. If you need your challenge to be successful, it is essential to observe every stage within the process very rigorously. If you don’t really feel comfortable dealing with drywall, you all the time have the option of hiring knowledgeable to finish the duty for you. They will have the power to work safely across the plumbing and electrical elements that are positioned within the wall, and they’ll ensure that the repairs are carried out precisely.
Utilizing a Tape for the Joints
In the occasion that your drywall is peeling or splitting, you could fix the problem by applying joint tape to the affected areas. These gadgets are available in numerous sizes to accommodate a variety of initiatives since they had been developed to assist reinforce and conceal wall seams. If the outlet is small enough, you might get away without using joint tape and use spackle or drywall compound as an alternative.
To start, you will want to get the area prepared for the restore. Remove any paint chips or drywall items that will have amassed, then clean up the hole. Sanding the area to a smooth finish is the subsequent step. Using a hand-held sander or a drywall curler is the best way to complete this activity. After you may have completed sanding, you want to apply a layer of primer and wait for it to dry before persevering with with the painting course of.
Next, you’ll need to choose between using paper joint tape or fiberglass joint tape for the joints. Paper tape has creases already in it and may be purchased in rolls which are both 250 or 500 ft lengthy and a pair of inches extensive. It is the most common type of tape used for mending seams and corners, and it could be purchased in both regular and mesh varieties. Paper is thinner than mesh tape, which allows it to be utilized in locations that are extra prone to be stressed, corresponding to corners that are near windows and doors.
After you have chosen the kind of tape that you’ll use, minimize it to the suitable length, after which fold it along the crease that runs down the middle of it. Next, push it into the moist joint compound with the joint software. It’s potential that you’re going to need to apply more than one layer of tape, however that may depend upon the sort of joint compound that you just’re working with. For occasion, sure varieties of joint compound name for the application of a bedding coat previous to the appliance of the tape.
Another option is to make use of self-adhesive joint tape, which does not require a bedding software and is simpler to deal with than conventional joint tape. These could also be discovered on the majority of companies that sell residence enchancment supplies.
After the joint compound has had enough time to dry, you should sand the realm as soon as more. You should reap the benefits of this moment to transition to an even bigger knife so as to get a end that is extra blended and clean. After that, you may prime and paint the area in order that it blends in with the partitions round it. If the drywall in your house has not but been painted, now is a wonderful time to get began on that venture…..